 how-to
How Long Does Spray Foam Roof Installation Take?
Quick Summary
A typical spray foam roof installation takes about one to three days for a standard home, but the full project runs longer once curing and coating are included. Spraying itself is usually the shortest phase, while preparation, cure time, and weather can extend the schedule. Roof size and complexity have the biggest effect on the timeline.
- Spraying is usually the shortest part; preparation, cure, and coating take most of the schedule.
- Roof size, dormers, valleys, and penetrations add stop-and-start work and extra days.
- Rain, wind, and extreme temperatures can pause spraying and shift the timeline.
- Plan around three dates: last spray day, coating day, and contractor sign-off for normal access.
- Do not walk on the roof until the foam has cured and the protective coating is applied.
Table of Contents
- Typical Spray Foam Roof Installation Timeline by Roof Size
- Step 1: Preparing the Roof and Protecting the Property
- Step 2: Spraying the Foam and Managing Weather Delays
- Step 3: Foam Curing Time and When the Roof Is Ready for Use
- Step 4: Applying the Protective Coating and Its Timing
- Scheduling Your Spray Foam Roof Project With Sun Flex Home Improvement
- Frequently Asked Questions
Typical Spray Foam Roof Installation Timeline by Roof Size
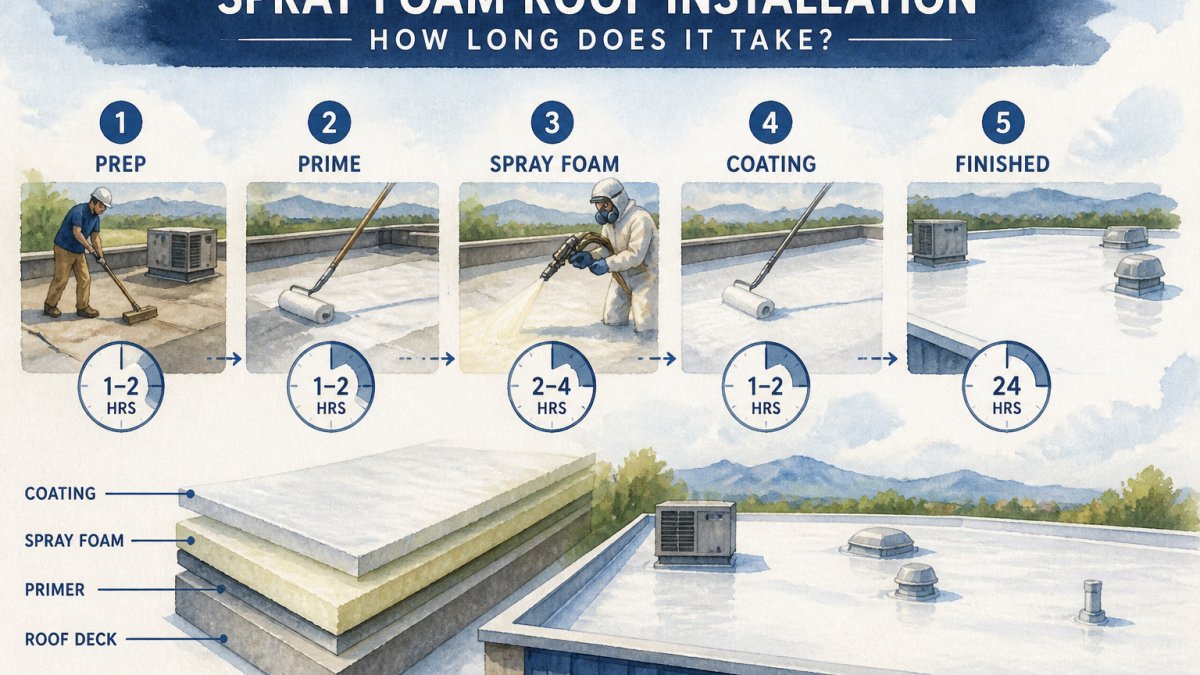
How long does spray foam roof installation take? The honest answer is that the clock starts well before the spray gun and ends after the coating cures. For a typical single-family roof, scheduling depends on roof size and conditions. A small, simple roof can finish in one long day of spraying plus a return trip for coating; a large or cut-up roof can stretch to a week or more once curing and weather windows are factored in.
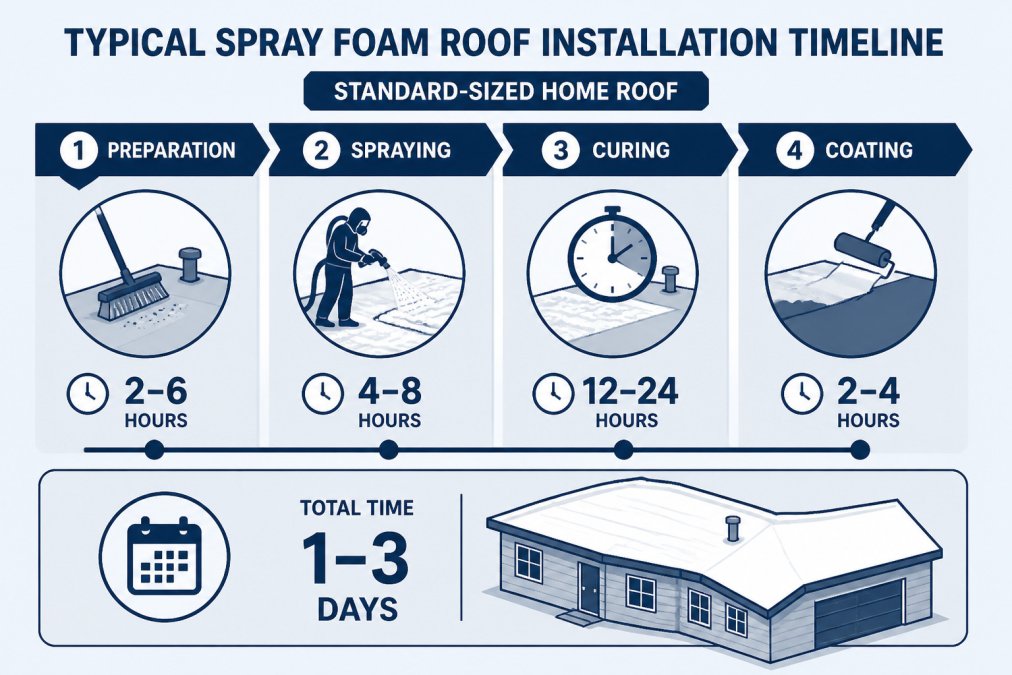
The number most homeowners picture, the spraying itself, is usually the shortest part of the job. Spray output depends on thickness, equipment, and roof conditions. The rest of the schedule is preparation, cure time, coating, and inspection.
Phase-by-Phase Schedule With Realistic Time Ranges
A roof-specific schedule looks like this, assuming fair weather and a roof in reasonable condition:
| Phase | What Happens | Typical Duration |
|---|---|---|
| Mobilization and setup | Crew arrives, stages equipment, sets up fall protection, masks the property | 2-4 hours |
| Surface preparation and repairs | Cleaning, removing debris, patching blisters, priming if specified | 4-8 hours (longer if repairs are extensive) |
| Spray foam application | Foam applied in passes to specified thickness | 1 day for most home roofs; 2-3 days for large or complex roofs |
| Foam cure before coating | Foam sets and cools; manufacturer's recoat window applies | Same day to 24 hours for most systems; longer in cool or humid conditions |
| Base coat application | First protective coating pass | 2-4 hours |
| Top coat application | Second coating pass after base coat is ready | 2-4 hours, often the next day |
| Final inspection and cleanup | Thickness checks, drainage review, demobilization | 2-4 hours |
Coating is often applied on a return visit after the foam has had time to cure. Project length varies with the roof and its condition, and your contractor can provide a schedule for your property.
How Roof Size and Complexity Change the Schedule
Roof area sets the baseline, but geometry and penetrations drive the overrun. A simple gable roof with a low pitch and few openings sprays fast because the crew can work in long, uninterrupted passes. A roof with dormers, valleys, skylights, chimneys, HVAC curbs, and plumbing vents forces stop-and-start work: each penetration needs masking before the spray and hand detailing after it, and those minutes add up across dozens of obstacles. To compare how spray foam and TPO systems differ in installation timing, see the side-by-side overview.
As a rough planning guide:
Access matters as much as size. A roof the crew can reach with a ladder and stage equipment close by moves faster than one requiring lifts, crane access, or long hose runs. Roof pitch, height, and the condition of the existing substrate, especially whether old roofing must be removed first, can each add a day.
Crew size shifts the math but does not erase it.
Step 1: Preparing the Roof and Protecting the Property
Preparation is where a well-run job starts. Crews clean the substrate, remove loose debris, and make repairs before any foam goes down. Skipping this step can cause adhesion problems later, so it should not be rushed. For a full walkthrough of flat roof applications, see the complete guide.
Property protection takes time too. Crews mask windows, doors, vents, and other openings, and they cover landscaping and nearby surfaces. This work usually happens before spraying begins.
What Homeowners and Building Managers Should Do Before Installation
Before the crew arrives, a few simple steps make the job smoother:
- Move vehicles away from the house and out of the work zone.
- Secure pets and let neighbors know work will be happening.
- Clear patio furniture, planters, and outdoor items near the walls.
- Confirm access to the roof and the attic or interior spaces.
- Ask the contractor for a written schedule with expected phase dates.
Good preparation shortens the job and reduces the chance of delays on day one.
Step 2: Spraying the Foam and Managing Weather Delays
Spraying is the fastest visible part of the project, but it depends heavily on conditions. The crew applies the foam in passes, building thickness layer by layer. Speed depends on the roof, the equipment, and how many passes the specification requires.
Weather can change the plan quickly. Work may be paused for rain, high wind, or temperatures outside the foam manufacturer's range.
Weather Conditions That Pause or Stop Work
Common conditions that can interrupt spraying include:
- Rain or wet surfaces: Moisture can stop foam from bonding properly.
- High wind: Wind can scatter overspray and make application unsafe.
- Cold or very hot temperatures: Foam performance depends on the surface and air temperature.
- High humidity: Humidity can affect curing and adhesion.
When work stops, the schedule usually shifts by a day or more. Ask your contractor how weather delays will be handled before the job starts.
Step 3: Foam Curing Time and When the Roof Is Ready for Use
Curing is where spray foam schedules most often get misread. "Cured" is not one moment, it is a series of thresholds, and each one gates a different next step. Understanding them lets you plan access, coating, and move-in dates instead of guessing.
The Three Cure Thresholds That Control the Schedule
1. Set or tack-free time. Within minutes to a couple of hours of spraying, the foam stops being sticky and can no longer be worked. This is not full cure; it simply means the surface has skinned over. Crews use this window to judge whether the pass looks uniform.
2. Recoat or walkable time. Before the protective coating goes on, the foam must be cool and dry enough to accept it, and firm enough to support limited foot traffic for inspection. For many spray polyurethane foam roofing systems this is measured in hours, often the same day or the next morning, but the manufacturer's data sheet governs.
3. Full cure. Complete cure develops over days, not hours, and depends on thickness, ambient temperature, and humidity. Thick passes cure from the outside in, so a roof sprayed heavily in one area may need more time than a thin, uniform pass elsewhere. Cool, humid weather slows cure; warm, dry weather speeds it.
When the Roof Is Ready for Normal Use
The roof is ready for normal foot traffic and routine use only after two things happen: the foam has cured to the manufacturer's recoat specification, and the protective coating has been applied and has cured enough to resist traffic. To confirm whether spray foam roofing is waterproof once cured, read the complete guide. Until the coating is on, the foam is vulnerable to sunlight, which degrades unprotected SPF, so the coating is not optional cosmetic work, it is part of what makes the roof usable.
In practice, that means:
- During spraying and early cure: keep all foot traffic off the roof except the crew.
- Between foam cure and coating: limited crew access only, for inspection and coating.
- After coating cures: normal access resumes, subject to the contractor's sign-off.
If you rely on the roof for HVAC service access, storage, or equipment, tell the contractor before the job so those needs are built into the schedule rather than discovered mid-project.
Re-Entry and Occupancy Inside the Building
Curing also affects the people inside. Spray foam application produces odors and airborne particles during spraying, and the building's HVAC system should be isolated or protected during the work. Re-entry guidance for occupants, especially for sensitive groups, should come from the contractor and the foam manufacturer, and it is typically tied to ventilation and the same cure thresholds described above. For a roof-only project, interior disruption is usually limited, but confirm it in writing.
Step 4: Applying the Protective Coating and Its Timing
The protective coating shields the foam from UV exposure and weather. It is usually applied after the foam has cured. Ask your contractor which coating is specified and how it will be applied.
Coating timing is one of the most common sources of schedule confusion. Ask your contractor which coating is specified, how many coats are required, and how long each coat needs before the next step.
Scheduling Your Spray Foam Roof Project With Sun Flex Home Improvement
Planning a spray foam roof is easier when you know the phases and their rough durations. If you need a local option, you can repair or inspect a flat roof in Wyoming before scheduling. Sun Flex Home Improvement, with over 25 years of industry experience, can walk you through a timeline based on your roof's size and conditions. Request a Free Estimate to get a schedule that fits your property.
Frequently Asked Questions
How long does spray foam roof installation take for a standard home? For a standard-sized home roof, the full job often takes about one to three days. Weather, roof complexity, and curing requirements can extend that timeline.
Can you walk on a spray foam roof right after installation? Not right away. Foam needs time to cure, and the protective coating needs its own window. Follow the contractor's guidance on when the roof is safe to walk on.
What causes spray foam roof projects to take longer? Rain, wind, extreme temperatures, complex roof shapes, and many rooftop penetrations can all extend the schedule.
Frequently Asked Questions
How long does it take to install a spray foam roof?
A spray foam roof's timeline depends on roof size, pitch, access, and weather. Preparation and masking take the first part of the schedule, spraying follows, and the foam must then cure before coating. Larger commercial or agricultural roofs and roofs with many penetrations, skylights, or irregular edges take longer. A written estimate from Sun Flex Home Improvement can give a schedule tailored to your specific roof.
Can a spray foam roof be installed in one day?
Spraying is only part of the job. Surface preparation, site protection, and the cure window before the protective coating is applied all add time, and weather can extend the timeline.
How long does spray foam roofing take to cure?
Spray polyurethane foam typically reaches a usable state within a short period after application, but the full cure that allows coating and foot traffic depends on conditions. Cooler temperatures, high humidity, and wind can slow curing. The exact window depends on the foam product and manufacturer specifications, so Sun Flex Home Improvement confirms re-entry and coating timing before the crew leaves the site.
How long after spray foam application can a roof coating be applied?
The protective silicone or acrylic coating is usually applied after the foam has cured sufficiently, commonly after the cure window noted in the manufacturer's specifications. Applying coating too early can trap moisture or cause adhesion problems, so timing is checked before the coating crew begins.