 how-to
How to Clean Spray Foam Roof Coating: Step-by-Step Guide
Table of Contents
- Why Cleaning Your Spray Foam Roof Coating Matters
- What You'll Need Before You Start
- Spray Foam Roof Cleaning Products That Work
- Step-by-Step Instructions for Cleaning Spray Foam Roof Coating
- Pressure Washing Spray Foam Roof: When It's Safe
- Spray Foam Roof Maintenance and Inspection
- Common Mistakes to Avoid When Cleaning Spray Foam Roofs
- When to Call a Professional
- Frequently Asked Questions
Last Updated: October 14, 2026
Why Cleaning Your Spray Foam Roof Coating Matters
A clean spray foam roof creates a seamless, protective barrier that keeps water out and energy costs down. Over time, dirt, debris, and algae degrade the coating's ability to reflect sunlight and shed water, so regular cleaning extends its lifespan and protective qualities.
A clean roof reflects more heat, resists water penetration, and shows fewer signs of premature wear.
Cleaning your spray foam roof coating isn't just about appearance. It's about protecting your investment. A well-maintained roof stops leaks before they start. It keeps your building warmer in winter and cooler in summer. The energy savings alone justify the effort.
What You'll Need Before You Start
Proper preparation prevents damage and ensures safety. Gather your materials and equipment before you climb onto the roof.
Safety Equipment and Fall Protection
Working at height requires serious precautions. Falls are the leading cause of serious roofing injuries. Never skip safety gear, even on low-slope roofs.
Essential safety equipment includes:
- Fall protection harness, Non-negotiable. Attach it to a secure anchor point.
- Safety rope, Use a rope rated for your weight plus 50%.
- Hard hat, Protects against head injuries from falls or dropped tools.
- Non-slip shoes, Rubber soles provide grip on wet surfaces.
- Work gloves, Protect hands from sharp edges and chemicals.
- Safety glasses, Shield eyes from spray and debris.
Check all equipment before use, a harness with worn straps fails when you need it most. Test your anchor point with your full weight first.
Consider hiring professionals for roofs steeper than 4:12 pitch or higher than 20 feet. The risk isn't worth the savings.
Cleaning Tools and Equipment
The right tools make cleaning easier and safer. Wrong tools damage the foam coating.
You'll need:
- Soft-bristle brush, Stiff brushes gouge spray foam. Use a brush rated for delicate surfaces.
- Low-pressure spray equipment, A garden hose with adjustable nozzle works well. Avoid pressure washers initially.
- Cleaning solution applicator, A pump sprayer or soft mop applies solution evenly.
- Bucket, For mixing cleaning solution and rinsing your brush.
- Squeegee, Helps direct water toward drains and prevents pooling.
- Ladder, Sturdy and tall enough to reach the roof safely.
- Extension poles, Reach distant areas without overextending.
Keep all equipment in good condition. A cracked bucket leaks solution. A bent squeegee leaves streaks.
Spray Foam Roof Cleaning Products That Work
Not all cleaners are safe for spray foam. Some dissolve the coating. Others leave residue that attracts dirt faster.
Safe Cleaners for Spray Foam Surfaces
Mild cleaners work best on spray foam roof surfaces, removing dirt without damaging the protective coating.
Water and mild soap is often sufficient for light dirt. Mix a few drops of dish soap in a bucket of water. This cleans most surface debris without risk.
Biodegradable roof cleaners are formulated for foam roofing. They break down organic growth like algae and mold.
Oxygen-based cleaners gently remove stains without harsh chemicals. They work slower than acidic cleaners but won't damage the foam. Spray, let sit for 15-20 minutes, then rinse.
Test any new cleaner on a small, inconspicuous area first. Wait 24 hours and inspect for discoloration or texture changes before treating the entire roof.
Chemicals to Avoid on Spray Foam Roofs
Certain chemicals degrade spray foam or leave permanent damage.
Bleach and chlorine kill algae but can discolor the foam and weaken its protective layer. Avoid entirely.
Acidic cleaners (vinegar, muriatic acid) etch the foam surface and create rough spots that trap dirt. Don't use them.
Petroleum-based solvents dissolve the foam coating. This includes gasoline, acetone, and paint thinner. Keep all solvents away from the roof.
High-pressure detergents designed for concrete blast away the foam's top layer, leaving the roof vulnerable to UV damage and water infiltration.
Abrasive powders scratch and gouge the surface. Avoid scouring powders and gritty cleaners.
When in doubt, stick with water and mild soap, a slower clean beats a damaged roof.
Step-by-Step Instructions for Cleaning Spray Foam Roof Coating
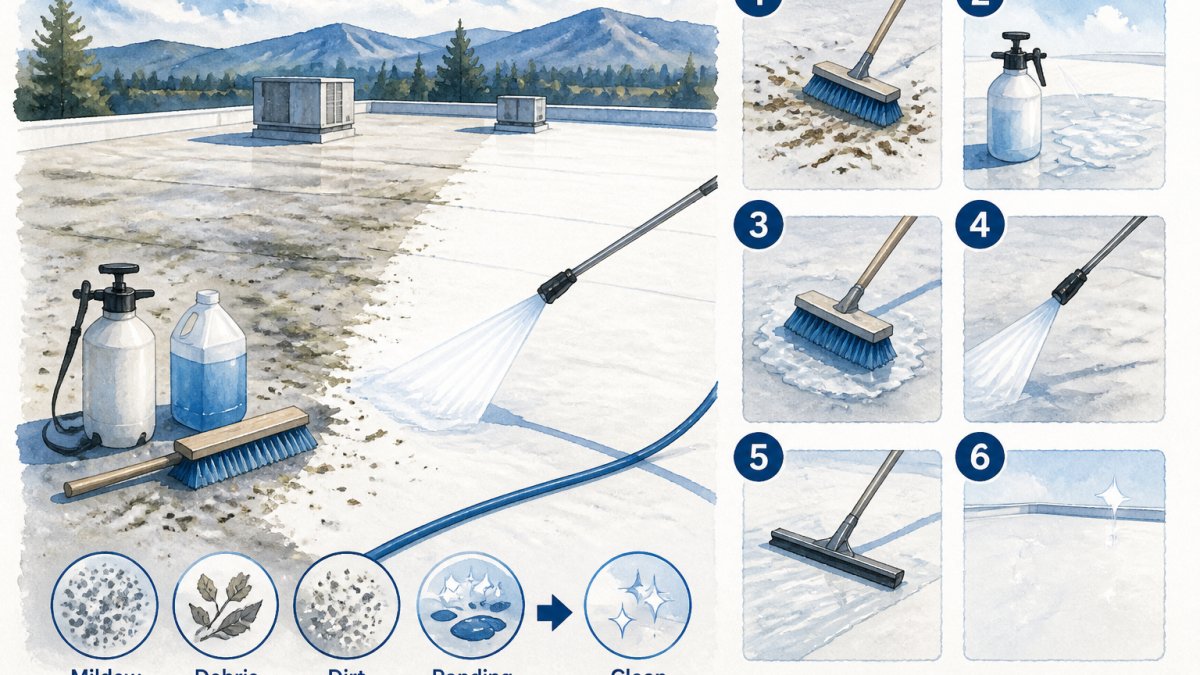
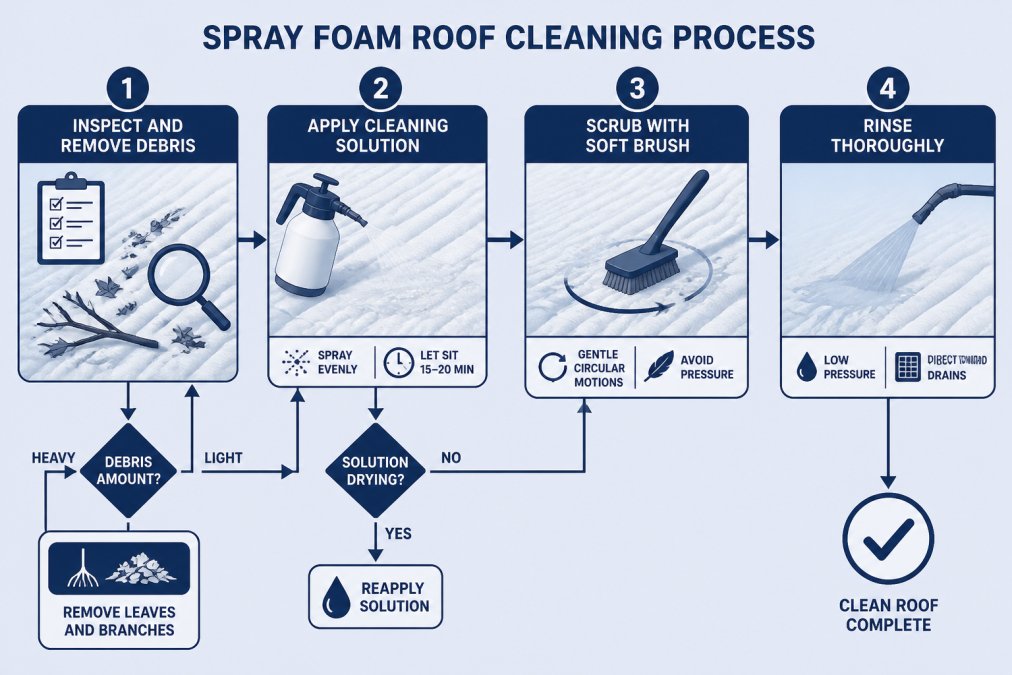
Follow these steps to clean your spray foam roof safely and effectively, ensuring a clean spray foam roof that lasts for years.
Step 1: Inspect and Remove Large Debris
Start with a visual inspection: walk the roof carefully and note any damage, pooling water, or heavy debris.
Remove large debris by hand or with a soft broom. Leaves, branches, and dirt accumulate in valleys and near drains, clear these first so water flows freely.
Don't use a stiff broom or push hard; gentle sweeping removes loose material without damaging the foam. If debris is stuck, let the cleaning solution loosen it.
Check for cracks, blisters, or soft spots and mark damage for later repair. Don't apply water or cleaner to damaged areas until they're fixed.
Step 2: Apply Cleaning Solution
Mix your chosen cleaner per package directions, starting with water and mild soap if unsure.
Pour the solution into a pump sprayer and spray evenly in sections. Don't oversaturate, the foam should be damp, not dripping.
Let the solution sit 15-20 minutes to break down dirt and algae. On hot days, re-spray if the surface dries before scrubbing.
Work from the highest point downward so gravity helps the solution flow and you avoid wet, slippery areas.
Step 3: Scrub With a Soft Brush
Use gentle, circular motions with your soft-bristle brush. Don't press hard. The goal is to loosen dirt, not remove the foam.
Pay extra attention to areas with algae or stubborn stains. Brush until the discoloration lifts. If it doesn't budge after a few passes, let the solution sit longer rather than scrubbing harder.
Work in small sections, about 4 feet by 4 feet at a time. This keeps the solution from drying before you rinse.
Rinse your brush frequently in clean water. A dirty brush spreads debris around instead of removing it.
Step 4: Rinse Thoroughly
Use a low-pressure spray from your garden hose. Start at the highest point and work downward. Let water flow naturally toward gutters and drains.
Rinse until all soap residue is gone. Leftover cleaner attracts dirt and speeds up future buildup. A second rinse ensures complete removal.
Direct water away from seams, penetrations, and flashing, since pooling there can cause leaks. Use your squeegee to guide water toward drains.
Allow the roof to dry completely before walking on it. Wet foam is slippery and can be damaged by foot traffic.
Pressure Washing Spray Foam Roof: When It's Safe
Pressure washing can damage spray foam roofing if done incorrectly. Use extreme caution.
Low-pressure washing at 1,000 PSI or less is sometimes safe. High-pressure washing above 2,000 PSI will erode the foam surface. Never use pressure washers marketed for driveways or concrete.
Even at low pressure, keep the nozzle moving constantly. Holding it in one spot for more than a second can gouge the foam.
The safest approach is to avoid pressure washing altogether. A soft brush and mild cleaner accomplish the same result without risk.
Professional roofers have equipment calibrated for foam surfaces. If you choose pressure washing, hire a contractor experienced with spray foam roofing.
Spray Foam Roof Maintenance and Inspection
Regular maintenance prevents small problems from becoming expensive repairs. A few minutes each season keeps your roof in top condition.
Regular Inspection Schedule
Inspect your roof twice per year: once in spring and once in fall. These seasons catch damage before winter or summer weather worsens it.
After storms, check for new damage. Heavy wind, hail, or falling branches can create punctures or tears. Catching these early prevents water infiltration.
Walk the entire roof surface if it's safe to do so. Look at all angles and corners. Damage often hides in valleys or near penetrations.
Document your inspections with photos. This creates a record of your roof's condition over time. If you ever need to file an insurance claim, photos prove when damage occurred.
What to Look for During Inspection
Pooling water indicates drainage problems.
Cracks or splits in the foam allow water inside. Small cracks can be sealed with foam-safe sealant.
Blisters or bubbles suggest moisture trapped under the coating. These expand and burst over time.
Discoloration can indicate algae growth, mold, or UV damage. Clean algae promptly. UV damage requires professional assessment.
Soft spots mean the foam has absorbed water or begun to deteriorate. Press gently with your foot.
Seam separation at roof edges or around penetrations allows water in. Seams should be tight and sealed.
Flashing deterioration around vents, chimneys, or skylights is common. Flashing should overlap the foam coating.
Document all findings. Small repairs now prevent major damage later.
Common Mistakes to Avoid When Cleaning Spray Foam Roofs
Learning from others' mistakes saves time and money.
Using the wrong brush damages the coating. Stiff or wire brushes gouge the foam.
Applying too much pressure erodes the protective layer.
Mixing incompatible cleaners creates hazardous reactions. Bleach and ammonia together produce toxic gas.
Ignoring safety precautions leads to falls and injuries. Wear your harness every time.
Cleaning in direct sunlight causes the solution to dry too fast.
Neglecting drainage areas allows water to pool. Clear gutters, drains, and valleys thoroughly.
Skipping the inspection step means missing early damage. Always inspect before and after cleaning.
Using the wrong cleaner damages the foam coating. Acidic, petroleum-based, or abrasive cleaners harm spray foam.
The most common mistake is waiting too long between cleanings.
When to Call a Professional
Some situations require professional expertise. Knowing when to call saves you money and prevents damage.
Roofs steeper than 4:12 pitch are difficult and dangerous to access.
Roofs higher than 20 feet require specialized fall protection.
Extensive algae or mold growth may indicate underlying moisture problems.
Visible damage like cracks, blisters, or soft spots requires professional assessment.
Pools of standing water suggest drainage problems beyond simple cleaning.
Unknown roof age or condition calls for professional inspection.
Pressure washing damage requires professional repair.
Sun Flex Home Improvement specializes in spray foam roof maintenance and repair.
Protecting your spray foam roof coating requires consistent attention, but the effort pays dividends.
Frequently Asked Questions
How often should a spray foam roof be cleaned?
Most spray foam roofs benefit from cleaning once or twice per year, depending on your environment. Areas with heavy dust, pollen, or debris may need more frequent cleaning. Inspect your roof after severe weather or seasonal changes. Regular cleaning prevents dirt and algae buildup, which can degrade the protective coating and reduce the roof's lifespan. A maintenance schedule protects your investment and keeps the coating functioning as intended.
What cleaning products can damage a spray foam roof coating?
Avoid harsh chemicals like bleach, acetone, petroleum-based solvents, and strong degreasers on spray foam roofs. These can degrade the foam structure and damage any protective coating. Never use high-pressure power washers above 1500 PSI, as the force can erode the foam surface. Acidic or alkaline cleaners can also compromise the coating. Stick to mild detergents, biodegradable soaps, and products specifically formulated for spray foam surfaces. When in doubt, test any cleaner on a small, inconspicuous area first.
Can you pressure wash a spray foam roof?
Low-pressure rinsing with a pressure washer set below 1500 PSI is acceptable for spray foam roofs, but high-pressure washing is not recommended. High pressure can damage the foam surface, create divots, and compromise the protective coating. Use a wide fan nozzle and keep the nozzle at least 3 feet away from the surface. For heavily soiled roofs, soft-brush scrubbing combined with a mild cleaning solution followed by low-pressure rinsing is safer and more effective than pressure washing alone.
How do you remove dirt and debris from a spray foam roof?
Start by manually removing large debris like leaves, branches, and dirt with a soft-bristled brush or broom. For stubborn dirt, apply a mild cleaning solution and let it sit for 10-15 minutes before gently scrubbing with a soft brush. Rinse thoroughly with low-pressure water or a garden hose. Never use abrasive materials or stiff brushes that can scratch the surface. For heavily soiled areas, repeat the process rather than scrubbing harder. Always work from the highest point downward to prevent water from pooling.